
 As those who follow me know, I was the victim of a hit-and-run collision last September 24th on my last training ride on Pacific Coast Highway the day before Malibu Triathlon. The bad news was that my tri-bike (a Diamondback Andean), which took the brunt of the impact, was destroyed. The good news was that I wasn’t. The other bit of good news was that my insurance company covered the loss of my now-dead Diamondback (RIP), allowing me to build my dream triathlon bike.
As a self-confessed gear geek, this gave me the opportunity to spend hours scouring the internet for the latest and greatest technology that would make my new tri-bike as fast (and as cool!) as it possibly could be. I decided to source and build my dream tri-bike from scratch rather than buy a stock bike from a retailer so I could get the exact bike I wanted. Though more time consuming (it was time that was fun for me), a bonus to this approach was that I saved $1000s over a pre-built bike from a manufacturer.
Frameset
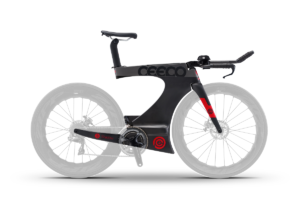
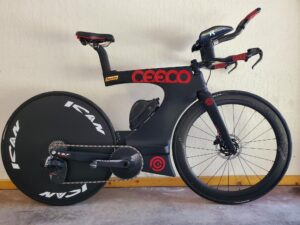
Every bike build begins with a frameset. I’m partial to non-traditional frame designs (referred to as “non-double-diamond”) because, well, they look cool and stand out from the typical triathlon bike frame. In my searches, I discovered Ceepo, a boutique frame builder from Japan. Their Shadow model is what is called a beam bike, meaning there is no seat tube or seat stays. There are other triathlon bikes with this design, but I liked the Shadow’s simple design and clean lines.
Components
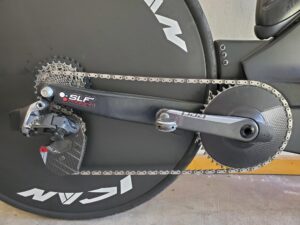 Triathletes basically have two choices when it comes to drivetrains: SRAM or Shimano. I’ve been a SRAM guy for several years because it is both electronic and wireless (yes, Shimano just came out with a similar system). I chose the SRAM Red Etap AXS 1x drivetrain with a Quarq power meter. A 1x means there is no front derailleur and only one chainring in front, which means it is simpler and has fewer problems (no drop chains while front shifting). It’s also one of the most popular drivetrains among the pros these days. My set-up is 49t in front and 10-33t rear. I completed the drivetrain system with SRAM Red Etap AXS clics and multiclics remote shifters located at the ends of my bullhorns and aerobar extensions.
For the brake system, I selected the SRAM Red Etap AXS aero brake components (see images of the cockpit below) My chain is Red “flattop.” And, for pedals, I went with the Wahoo Speedplay Nano Titanium pedals for their lightweight and ease of entry and exit.
Wheels & Tires
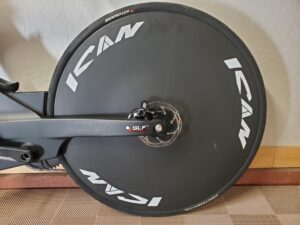 A dream triathlon bike isn’t a dream triathlon bike unless it has a deep-dish front wheel and a disc wheel in back. The problem is that the combination from name-brand wheel makers is incredibly expensive (upward of $2500 or more!). I just couldn’t go there. That’s when I discovered ICAN Cycling, a Chinese manufacturer whose wheels are UCI approved. ICAN also had some very good product reviews online. Of equal importance, ICAN wheels were affordable. I chose a 55mm front wheel and their DC04 rear disc wheel (only $800 for the disc).
For tires, I chose the most popular road tires out there (and reasonably priced too): Continental GP5000 TR, a tire that I ride tubeless (fewer pinch flats), but can be ridden with a tube.
Saddle
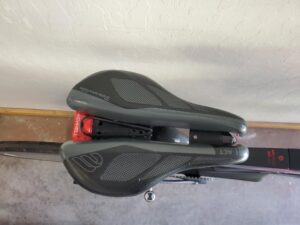
I’ve been struggling with saddles for my entire cycling and triathlon career. I had just accepted that, at the end of a ride, I would either be numb or in pain in my nether regions down below. That is, until I discovered BiSaddle, the only saddle company that enables riders to adjust the saddle to their own unique body type and position. I chose the BiSaddle Bonneville for my new tri-bike. My BiSaddle was an absolute game changer for my backside. Goodbye numbness and pain, hello comfort!
Cockpit
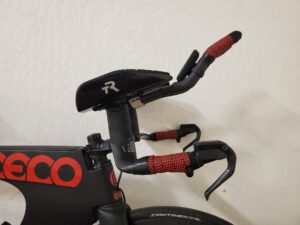
 I have to say that cockpits can get downright expensive if you go with the top-end products. But, though I was building my dream tri-bike, I had limits on what I would spend. After copious research, I landed on the Vision Trimax Carbon SI 013 bullhorns and extensions, coupled with the TriRig Scoops arm rests.
Over-sized Pulley Wheel System (OSPW)
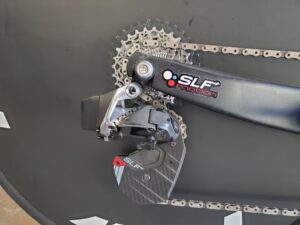 I realize that OSPW systems are controversial in whether they actually produce a significant increase in wattage with a reduction in effort, but I just couldn’t resist as they are incredibly cool looking and I believe they have made me faster. There are some big players in the OSPW space, but I discovered SLF Motion, a new company that is making the most innovative drivetrain components on the market today. I chose their new EVO Aero System.
Hydration
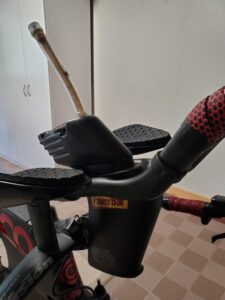
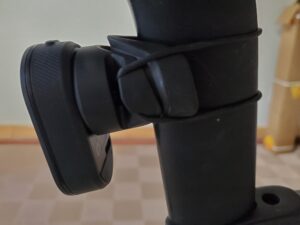
 Of course, my dream tri-bike needed a hydration system. First, for hands-free hydration in the cockpit, I chose the XLAB Hydroblade. For the downtube, I opted for the XLAB AeroTT.
Shoes
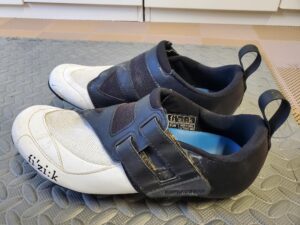 You might not think of shoes as part of a tri-bike, but they certainly are integral to its functioning. Also, one of my old tri-shoes was literally blown off my foot when I got hit by that car and it was never found, so I needed a new pair. I decided to stick with what I had before, the Fizik Transiro Powerstrap R4, because it is lightweight, has only one strap for easy on and off, and a very reasonable price point.
Final Touches
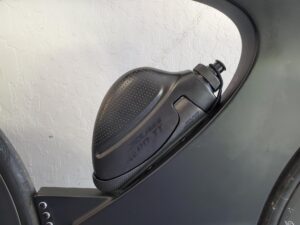
 With all of the above in place, my dream tri-bike was almost complete. I just needed a few small final touches to make it truly road ready. First, my Garmin 830 head unit survived my crash so I mounted that in my cockpit. I also recently added the Garmin Varia RV315 rearview radar for safety, confidence, and comfort on the road.
Conclusion
So there you have it! My dream tri-bike in all its glory. I’m been training and racing on it since the spring and absolutely love how it rides, how fast it is, and, admittedly, how cool it looks and the attention it gets at races. My dream tri-bike truly brings me joy every time I climb aboard and go for a ride. Life just doesn’t get much better than that!